 |
Importing text using drag and drop
Pasting in text from the clipboard
Highlighting text using the Selection tool
Searching for and replacing text
Replacing a text string or selection
Checking text assigned to one language
Checking text using more than one language
|
Working with textThis chapter explains how to work with text in a Freeway document. You can type in text yourself, or import existing text from another source. Once you have text in your document, you can: · copy and paste it · edit, correct and modify it · search for and replace text strings · check the spelling · apply attributes and change styles. Adding textThere are several ways you can add text to a Freeway document. You can: · type in new text directly · import a text file previously prepared in another application · paste in text that has been copied to the clipboard from another Freeway document, or another application · drag text from another application that supports Drag and Drop. Typing in new textTo type new text directly into a box: 1. Using the Selection tool, click inside the box to position the cursor. A flashing vertical bar appears at the insertion point. 2. If there is already text in the box, you can move the insertion point to another position, either using the arrow keys, or by clicking at the new position. 3. Begin typing. To start a new paragraph, press Return. The style of the new text depends on where you started. If you started typing inside an existing run of text, the new text has the same style as the rest of the run. If no style has been assigned, the new text appears in the default style. Importing textYou can import text saved as a file using the Text-Only format or Styled Text. Unfortunately, Freeway does not currently import text files in other text formats. There are two ways you can import text into a box: · Using the Import Text... command, or · Using drag and drop Importing a text file using the Import Text... commandTo import a text file prepared using a word processor or some other application, and saved as Text-only: 1. Using the Selection tool, click inside a box to position the cursor where you want the imported text to appear. 2. Choose File/Import Text...: The scrolling list displays all the available files at this location. 3. Find and select the name of the file you want. 4. Click Open. The text is imported into the selected box. The new text will take on the style of the surrounding text, if it doesn't already have a style. If the text file is too large for the frame, the overflow icon shows in the bottom right-hand corner:
To fit all of the story into the box, you can reduce the size of the text or increase the size of the box. Alternatively, you can flow the story into a second box. Importing text using drag and dropYou can use two additional methods to import a text file using the drag and drop technique. Dragging a file from the Finder1. In the Finder, locate the text file you want to import. 2. Drag the file onto the Freeway document window, position it over the receiving box and release the mouse button. The text is imported into the box at the pointer position.
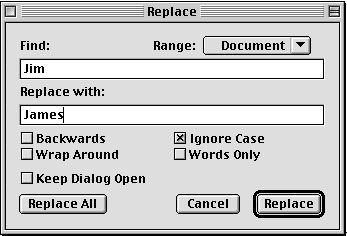
Dragging text from a drag and drop capable application1. Open the window of the application containing the text to be dragged in, and position it so that you can see the box on the Freeway page you want to drag it into. 1. Highlight the text 2. Drag the text into a Freeway box. Pasting in text from the clipboardAnother way to add text to a Freeway document is to use the clipboard: 1. Open the document containing the text you want to insert. 2. Select the text and choose Edit/Copy to copy it to the clipboard (the next section tells you how to select text). 3. Place the cursor at the insertion point in your chosen Freeway document and choose Edit/Paste. Highlighting textYou can make changes to text using basic editing techniques. However, before you can apply attributes to text, you need to select it. Highlighting text using the Selection toolUse the following techniques to select text: · place the cursor over a word and double click to highlight it · drag the cursor over a run of text to highlight it · place the cursor in a box and press Command-A to highlight all the text in the story Editing textFreeway uses standard Apple Macintosh techniques for editing text. Moving textTo move text, Cut it to the clipboard and Paste it in at a new position. With this method you can move text from one place to another within a story, from one story to another, or even between documents. Remember that when you move text to another part of a document, it may take on the style of the encompassing text. Searching for and replacing textYou can find or replace instances of words, combinations of words and characters in selected text, stories or documents. Finding a text stringTo search for a text string: 1. Choose Text/Find.... 2. Freeway displays the Find dialog box. 3. Type the word, combination of words or characters you want to search for. 4. Choose which part of the document to search from the following options in the Range popup menu: Document Searches within all stories in a document. Story Searches within the story where the cursor is placed (this option is disabled if nothing is selected). Item Searches the box containing the cursor (this option is disabled if nothing is selected). 5. Choose from the following options: Backwards Searches the run of text backwards from the cursor. Wrap Around Searches to the end of a story (or the beginning, if Backwards is checked) and then goes to the start of the text and continues back to the cursor. If Wrap Around is unchecked, Freeway searches to the end of the specified range. Ignore Case Finds characters typed in either upper or lower case. Words Only Matches text to whole words and does not locate specified text within words. For example, use Words Only to locate the word 'one' but ignore the word 'done'. Don't Close Leaves the dialog box open after the search is completed. Note that you get a warning when the end of a story is reached. 6. Click OK. Finding a selectionHighlight the text you need to find and choose Text/Find Selection. Freeway finds the next instance of the selected text. The Find Next command finds the next instance of the text currently highlighted on the page. Replacing a text string or selectionYou can search for a text string (or occurrences of a highlighted selection) and then replace it with another string: 1. Choose Text/Replace. The Replace dialog box appears: 2. Choose the Range you want to search from the popup menu. 3. Type the text you want to replace in the Find text box. 4. Type the replacement text in the Replace with text box.
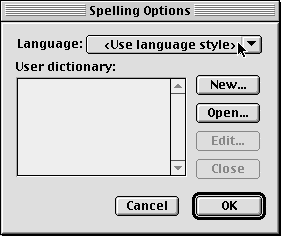
5. Choose from the other available options. These are the same as the options described for Find earlier in this section. 6. Click Replace to replace the next instance and then stop. Click Replace All to search the story, selected text or document and automatically replace all the instances of the specified text. Note: You can undo a Replace operation, but not Replace All. Freeway then finds and replaces the text. If you've checked Keep Dialog Open, the dialog box remains open for you to use again. The Replace Next optionChoosing Text/Replace Next replaces the next occurrence of the text without displaying the Replace dialog box. Checking spellingYou can check the spelling in your document against words listed in any installed dictionaries. The dictionaries must be in the same folder as the Freeway application software. If Freeway finds a word which is not in the dictionary, it offers alternatives, if possible. Since spell checking is not context-sensitive, Freeway will not pick up words which are spelled correctly but in the wrong place, although it does flag repeated words. On the other hand, it will identify words which are correctly spelled, but which are not in the dictionary. You then have the option of adding these words to the dictionary. You can work with text in several different languages in the same document. You can apply a language to highlighted text using the Text menu, or you can select the default language through the Style dialog box. Once the language is identified and the appropriate dictionary installed, Freeway will automatically use the correct dictionary to carry out the spelling check. Freeway ships with dictionaries for US and UK English, but there are also dictionaries available from SoftPress for certain European languages as well. Contact SoftPress or visit the SoftPress Web site for more information. Checking text assigned to one languageIf text is highlighted when you use the spell checker, Freeway automatically assumes you want to check that text. You control whether Freeway checks the story, the document or a frame in the Spelling dialog box. To check spelling: 1. Choose Text/Spelling.... Freeway displays the Spelling dialog box, labelled with the name of the dictionary in use. 2. If necessary, choose Document, Story or Frame to direct Freeway to the correct part of the document. 3. Click Start to start the spelling check. If an unknown word is found, it is displayed, and alternative spellings are shown in the Suggestions scrolling list. The most likely alternative is placed in the Change to text box. Alternatively, you can choose a word from the scrolling list by clicking on it, or type a word into the Change to text box. 5. With the correct word in the Change to text box, click one of the following: Change Changes this one occurrence of the word. Change All Changes all occurrences of the word. Ignore Ignores this one occurrence of the word. Ignore All Ignores all occurrences of the word. 7. Close the Spelling dialog box. Checking text using more than one languageIf you're checking a selection of text that includes more than one language style, you need to click on Options in the Spelling dialog box and check that Use language style is selected. During the spelling check, Freeway can then identify the appropriate dictionaries.
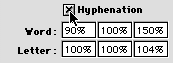
1. Choose Text/Spelling... Freeway displays the Spelling dialog box. 2. Click Options to display the Spelling Options dialog box. 3. The Language popup menu shows the language currently applied. The Use language style option sets Freeway to use the appropriate dictionary for the language applied to the text. Alternatively, you can choose to check all of the text against one dictionary. In this case, select the language name from the popup menu. 4. Click OK. 5. Click Start to start the spell check. Freeway automatically searches the appropriate dictionaries as it reaches text in different language styles. Working with user dictionariesIn addition to checking spelling against installed dictionaries, you can create your own user dictionaries to hold words appropriate to certain documents. This is useful, for example, if you have a document that contains many proper names or scientific terms. You can also copy user dictionary files and make them available for use with other Freeway documents. Setting up a user dictionaryTo set up a user dictionary: 1. Display the Spelling dialog box. 2. Click Options. Freeway displays the Spelling Options dialog box. 3. Click New.... 4. Enter a new name for the dictionary in the New User Dictionary text box. Identify a location to store the dictionary. 5. Click Save. Freeway creates a new dictionary file and returns to the Spelling Options dialog box. Adding and editing words in a user dictionaryTo add words during a spelling check: 1. Carry out a spelling check. 2. When Freeway reaches a word which is not in an installed dictionary, select a dictionary from the User Dictionary popup menu. 3. Click Add. Freeway adds the word to the named user dictionary. You can also add and edit words using the User Dictionary dialog box: 1. Display the Spelling dialog box. 2. Click Options. 3. Select a user dictionary from the scrolling list. 4. Click Edit. Freeway displays the User Dictionary dialog box with a cursor in the text box. 5. You can now add, change or remove words from the dictionary. You can also import another dictionary, or export this one. 6. When you've finished modifying the user dictionary, click OK, then click Done in the Spelling dialog box. Controlling HyphenationHyphenation in Freeway is available for GIF text, though not for HTML text. This is because HTML does not support Hyphenation, and it could not be properly duplicated in the browser. For GIF text, Hyphenation is off by default. If you want your GIF text to be hyphenated, you can edit the Default Style in preferences to turn on the Hyphenation checkbox - this will affect all the text in the current document - and can also be saved as an application default.
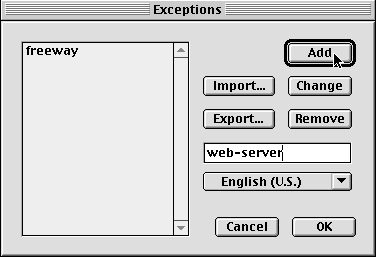
For a more local instance where you wish a run of text to have hyphenation, you can simply highlight the text and choose Style/Hyphenation. For finer control over when and how you wish text to be hyphenated, you can define a paragraph style with options for whether hyphenation is on or off, and the minimum, optimum and maximum letter spacing that should be used. Hyphenation is defined in the dictionary assigned to a run of text. You can alter the position and preference for hyphenation using the Edit/Exceptions command. Adding hyphenation exceptions to an installed dictionary1. Choose Edit/Exceptions to display the Hyphenation Exceptions dialog box. 2. Enter the word in the text box, typing hyphens where you want the word to be hyphenated, if necessary. You can enter a non-breaking hyphen using the equal (=) character. Any word which you do not want to hyphenate should be typed without hyphens. 3. Select the dictionary to which you want to add the word, then click Add.
Freeway adds hyphenation exceptions to a file which is used with the named dictionary. You can import this exceptions file to other documents using the Import... button in the Exceptions dialog box. |
|||

Back to the top |
|||